Sinden Lightgun SetupUpdated 6 months ago
We're currently in the process of integrating the Sinden Lightgun software into Polycade AGS. When this is complete, AGS will automatically install the Sinden software for you, and AGS will manage the launching & exiting of the Sinden software at the appropriate moments.
Until these features are released, you'll need to download & install the software yourself (see below), and you'll need to launch the Sinden software prior to using the lightguns.
Install The Sinden Software
- Download the Sinden Lightgun Software here: https://sindenlightgun.com/drivers/
- Unzip and place the SindenLightgunSoftwareReleaseV2.07 folder someplace (like your Documents folder).
- Locate Lightgun.exe here:
/SindenLightgunSoftwareReleaseV2.07/SindenLightgunWindowsSoftwareV2.07/SindenLightgun/Lightgun.exe - Because you need to run the lightgun software when you use the guns, you'll want to either:
- Make it easy to launch in the moment: Create a shortcut by dragging Lightgun.exe to the taskbar.
- Launch the software at startup: On your keyboard, press WIN+R to open the run box. Type "shell:startup", no spaces, no quotes. In the file browser you previously opened, right click on Lightgun.exe and drag it into the Startup folder that you just opened. When you release, the menu opens and you select "Create shortcuts here".
Configure the Lightguns
- Launch the Lightgun.exe software & plug in your lightgun.
- Go to the "Main" tab in the Lightgun.exe software. Your gun should be connected, pulling the trigger activates it. You should see the "Raw Camera" and "Processed Image" videos.
- If you don't have a black and white border on your screen, open it now by pressing the back button on the right side of the lightgun.
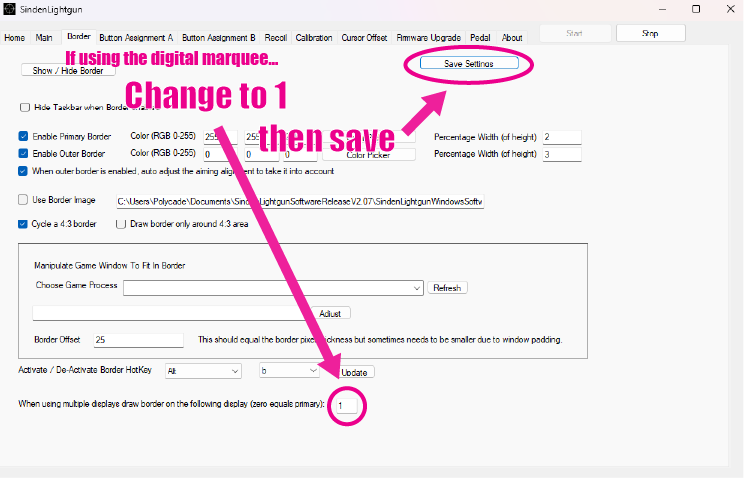
*** DIGITAL MARQUEE USERS *** It's possible your border shows up on the marquee screen instead of the main screen. In this case, click on the "Border" tab and change the value as indicated below:

4. To calibrate the lightgun, our goal is for the "Processed Image" to consistently show a blue rectangle with a white border as shown below. If you have the border up, your gun probably works like this already and you don't need to change further settings. If you don't have a consistent blue rectangle with white border, then you can adjust the "Contrast, Brightness, and Exposure" values shown in the "Main" tab of Lightgun.exe. Generally, a lightgun doesn't work with the default settings because your room is particularly bright or dark. In these cases, we'd suggest starting by making single digit adjustments in the Exposure value, then clicking "Set" and testing the gun again.
5. If you have lightguns with the "Recoil" feature, then click the "Recoil" tab. You'll need to agree to the terms and turn on the recoil feature by checking two boxes shown below:

Using the Lightguns
The Sinden lightguns work by using a camera to detect the screen position. They rely on a black and white (black outer, white inner) border around the screen to position themselves.
When you use the lightguns, you'll need to make sure:
- The Lightgun.exe software is running.
- There is a white & black border around your screen.
The black and white border can be physical, i.e. a border around your screen, or it can be in software, drawing the border around the edge of your screen. Hybrid should also work, i.e. a white border on the screen with a black Polycade cabinet. For notable lightgun arcade titles, we plan to integrate the white & black border into the bezel artwork for the game.
When the Lightgun.exe software is running, you can turn on/off the software border by pressing the back button on the right side of the Sinden lightgun. You can configure the border settings (i.e. width etc) in the "Border" tab of the Lightgun.exe software.
MAME Configuration
Once you complete the general lightgun setup described above, you'll need to make some changes in your mame configuration.
- Download this file: polycade.cfg
- Place in:
C:\Users\%username%\AppData\Roaming\polycade\emulators\mame\ctrlr\ - Either download this mame.ini and replace yours, or modify your mame.ini file using notepad so that the section shown below is the same in your file. File location:
C:\Users\%username%\AppData\Roaming\polycade\emulators\mame\mame.ini
#
# CORE INPUT OPTIONS
#
ctrlr polycade
mouse 1
joystick 1
lightgun 1
multimouse 1
offscreen_reload 1
#
# CORE INPUT AUTOMATIC ENABLE OPTIONS
#
paddle_device mouse
adstick_device mouse
pedal_device keyboard
dial_device mouse
trackball_device mouse
lightgun_device mouse
positional_device mouse
mouse_device mouse
MAME Per-Game Configuration
Most lightgun games should be pre-configured. In our experience, the occasional game needs the trigger and reload remapped. Follow the regular instructions for this, just keep in mind two "gotchas":
1. The trigger will only register in mapping if you are pointing the lightgun at the screen. If you did this correctly, MAME will show "Gun B0" as the button mapping. If done incorrectly, MAME will show "Gun B1" and / or other mappings.
2. If you move the gun while pulling the trigger, then MAME may register the movement as part of the mapping.
In either case described above, you'll need to try again by first pressing DELETE on your keyboard to remove the mapping, and then pressing ENTER to try mapping again.
Games & Further Configuration
Your main sources for lightgun games will be: Steam, Arcade ROMs, and console ROMs. We have a few links to Steam lightgun games here:
https://polycade.com/pages/helphq-2#/collection/2973/article/29559
Some Steam games require patches. Most of these are hosted on Sinden's wiki site, but usually just googling for "GAME NAME Sinden setup" gets you to the right place.
More Coming Soon
We have not yet experimented deeply using the lightguns with console ROMs, so we don't have guidance around this for you yet. Polycade AGS uses Retroarch to run console ROMs, here's Sinden's guide to using the lightguns with Retroarch: https://www.sindenwiki.org/wiki/Retroarch
Also, as indicated above, soon most of everything described above will be integrated in AGS and automatically setup for you.